Quadrant-Sizing for Efficient UI Rendering
Here I'll show a technique I came up with that lets StereoKit draw all the UI surfaces in a single draw call! Since StereoKit targets standalone Mixed Reality hardware as first class citizens, I'm always searching for the most efficient way of doing everything, while still providing flexibility to developers!
Constraints
The motivation for this technique was driven by a number of constraints! StereoKit uses an Immediate Mode UI system that has to be able to quickly rebuild the UI every single frame without state. I wanted to keep draw calls really low due to the platform, and didn't want a wildly complicated art workflow for creating UI assets.
One really good thing about StereoKit is that it's completely instance based! As long as I'm using the same mesh and material, I can draw a lot of instances quite nicely! All I needed to do is figure out how to leverage a single mesh and material to build something capable of enough visual variety.
My old implementation used 2 cubes per button, one for the colored part, and another for the white outline/base.
My initial implementation was to just scale and tint cubes. It was nothing fancy, but it looked good enough to start with, and it was really fast! It's also really easy to work with on the code side, since specifying a scale for size is really easy! So I decided to try and stick with that.
Slicing
The easiest way to keep workflow simple for artists, is to use a single model for the art asset. But if you just try to scale a model the same way as I did with the cubes, you just get an ugly stretched mess! A common solution for this in 2D content is the 9-slice, a sprite cut into 9 pieces so that it can be tiled to fill a given rectangle! It's not too onerous to create, and it's easy enough to code in the right environment.
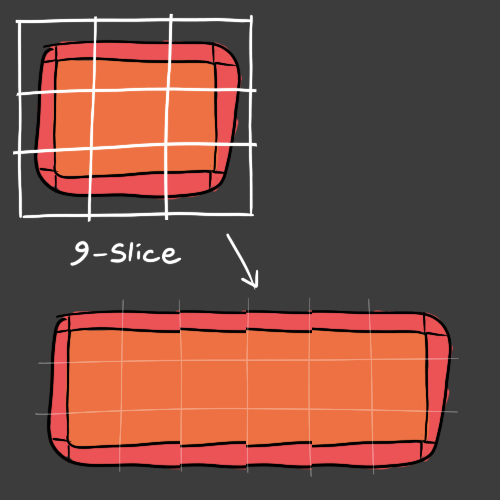
This is the basic idea of how a 9-slice works. Don't mind my terrible placeholder art :)
But if you apply this idea to 3D, the code is much more complicated, you can easily end up with 9x the draw calls, and the workflow to create a 9-sliced mesh is much harder than its 2D counterpart. You would also have to limit yourself to slicing on the X and Y axes, or you'll turn it into a 27-slice abomination! Artists will not thank you for a 27-slice, nor will your code-base or draw count.
So slicing didn't exactly look like a great option!
Quadrant-Sizing / 4-Slice
I spent a lot of time trying to come up with some way to simply scale a mesh without the awful scale distortion! If we toss texturing out the window and rely on solid colors, then all we have to worry about is vertex position distortion. And it turns out that if we don't care about UV/texture distortion, then there is a way to 'scale' without distortion!
The solution I came up with is conceptually similar to a 9-slice, but executed in the shader. If you separate each vertex into its own octant/quadrant, you can then just translate it using the scale value within that octant/quadrant! No distorted verts, a simple way to specify size, and only a single draw call! I'm calling this octant-sizing for the 3 axis case, and quadrant-sizing for the 2 axis case.

An here's that concept in motion on a mesh!
Of course, the idea is pretty simple, but the details still have some gotcha's hidden in them!
Implementation
The implementation I use in StereoKit right now is quadrant-sizing. It's a little less code than octant-sizing, and the z-axis scale distortion wasn't a major issue for me. I'll be showing you that implementation, and it should be pretty clear how to extend this to octant-sizing!
Scaling
First tricky bit is getting the scale, and making sure we can use it! When rendering instanced meshes in StereoKit, I only have access to a world transform matrix and color. I'm already using both of these when rendering UI elements, so I needed to extract the scale from the matrix itself.
Here's how I do that with HLSL in StereoKit! Scale for an axis is the same as the magnitude/length of the first 3 items of the corresponding row. You can also see that I'm restoring scale to 1 in the matrix by normalizing the row. Since we're using the scale for other purposes, we won't want it in the transform matrix.
float4x4 world_mat = sk_inst[id].world;
float2 scale = float2(
	length(world_mat._11_12_13),
	length(world_mat._21_22_23)
);
world_mat[0] = world_mat[0] / scale.x;
world_mat[1] = world_mat[1] / scale.y;
Quadrants
Then there's determining the octant or quadrant the vertex is in! If you have no vertices that sit at zero on one of the axes (which leads to divide by zero issues), then something like this could work quite nicely.
float2 quadrant = input.pos.xy / abs(input.pos.xy);I don't currently use this bit of code, because while I could have insisted no zero vertices as a requirement, or added extra shader logic, there's an additional problem that meant I needed a mesh pre-processing step regardless! So I moved quadrant calculation over to the pre-process step on the CPU, and check for zeros there.
Here's the last bit of HLSL I'll show! This is the formula from above that does quadrant-sizing on the vertex. This happens right before the model->world transformation. You'll also note we're using input.quadrant, as we'll be storing the quadrant information in the TEXCOORD0 attribute.
float4 sized_pos;
sized_pos.xy = input.pos.xy + input.quadrant * scale * 0.5;
sized_pos.zw = input.pos.zw;
For the complete shader source in context, you can check out the file on github!
Pre-Processing
The white box indicates the sizing that we provide the shader.
If you translate quadrant vertices by the scale value, you can see they stick out -past- the sizing! In some cases, that might not be much of a problem, but for managing the layout of the UI elements, I decided I wanted the sizing value to be the maximum extents of the visual element.
So in my pre-processing step I calculate the quadrant of the vertex, store that in the UV coordinates, and then subtract the quadrant's maximum value. This ends up with a weird and inverted looking mesh when rendered normally, but when the verts are translated by their quadrant scale, they end up at, but not past, the total size of the scale value!
The mesh now fits exactly within the box, but flips inside-out under a certain size.
To avoid flipping the mesh inside-out, we can clamp the sizing to prevent sizes below the bounds of the original mesh. As long as your source meshes aren't huge, this isn't a terrible limitation!
Here's the code for the pre-processing in C++.
void quadrantify(vert_t *verts, int32_t count) {
	float left   =  FLT_MAX;
	float right  = -FLT_MIN;
	float top    = -FLT_MIN;
	float bottom =  FLT_MAX;
	for (int32_t i = 0; i < count; i++) {
		if (verts[i].pos.x < left  ) left   = verts[i].pos.x;
		if (verts[i].pos.x > right ) right  = verts[i].pos.x;
		if (verts[i].pos.y < bottom) bottom = verts[i].pos.y;
		if (verts[i].pos.y > top   ) top    = verts[i].pos.y;
	}

	for (int32_t i = 0; i < count; i++) {
		float quadrant_x = verts[i].pos.x / fabsf(verts[i].pos.x);
		float quadrant_y = verts[i].pos.y / fabsf(verts[i].pos.y);
		if (verts[i].pos.x == 0) quadrant_x = 0;
		if (verts[i].pos.y == 0) quadrant_y = 0;

		verts[i].uv = vec2{ quadrant_x, quadrant_y };
		if      (quadrant_x < 0) verts[i].pos.x -= left;
		else if (quadrant_x > 0) verts[i].pos.x -= right;
		if      (quadrant_y < 0) verts[i].pos.y -= bottom;
		else if (quadrant_y > 0) verts[i].pos.y -= top;
	}
}
Results
So here's the result! Looks good, provides a fair bit of room for customization, and is super fast! I also topped off my shader with some vertex coloration for additional theming options, where I use the alpha channel to switch between an instance color, and a material color!
And here's an example of using this technique to create a pipe frame mesh!
Of course, in addition to a minimum size this technique does have limitations regarding texturing and the stretching that you might encounter there. I don't need textures for this implementation, but there are other use-cases where you might. Techniques like tri-planar mapping come to mind, but the final solution would probably vary depending on your use-case!
Anyhow, I thought this was a neat trick, and worth sharing :) If you have any comments or questions, feel free to pop by on the twitter thread!
Full source for StereoKit's quadrant-sizing shader can be found here.