Building a visual style part 2.
-2017.6.16 1:00pm
Now that we've talked about what the project is, I'll show you some details on how I implemented it! I'll also share some shader code too, in case you're interested in doing something similar.
If you haven't read the previous post, you'll be interested in catching that here. It talks about the overall concept of the project, and has some cool details in it too :)
Modeling and texturing.

Switching colors has never been easier!
I've lately become very fond of this texturing style! It produces crisp lines and allows you to focus on color choice. It's also great if you aren't an amazing texture painter. I play to my strengths: I'm definitely better at colors than I am at painting!
There's a couple major advantages to texturing this way! You can easily put your whole scene on a single, very small texture. Your texture memory becomes almost completely negligible, which is fantastic for low-RAM devices or environments like mobile or web where app size is a huge deal. You can reuse materials way more often and reduce draw calls without a complicated atlasing setup. And it's extremely easy to iterate on colors! Seriously, if you set it up right, you can change your entire scene by modifying that one texture.
I would like to add a few extra tools to Unity for working with palette textures. There are occasions where I need to add a material tint, or procedural color, and it would be nice for that to be consistent with the palette! Some smart indexed-color objects that reference back to the texture itself during runtime would be awesome.
Flat-lighting.

I like the way this lighting feels like subsurface scattering sometimes!
I spotted this lighting technique first in Kentucky Route Zero, and I fell in love with it right away! It's an extremely great complement to the modeling and texturing techniques that I use too. It adds a gentle gradient to the solid colors, but for the most part, it preserves the original look quite well.
You can achieve this effect by discarding the normals when doing your lighting calculations! This makes your lighting pure attenuation. It's pretty trivial to do this in Unity with a Surface shader, as you can see below. Typically the lighting function would include a dot product between SurfaceOutput.normal and lightDir, but this omission is what makes the look!
In my personal implementation, I don't actually use surface shaders. I use vertex/fragment shaders and switch over to Unity's vertex lighting pipeline for direct access to the lights! It cuts out a lot of overhead, but it's a lot more work to write, and misses out on a lot of Unity's features. That's a topic for another post though.
Emissive lighting.

Pretty dark, even the emissive parts.
I consider the emissive component to be super important to the look and feel of this project! Because so much of it is dark, any pieces that glow using emissive values stand out really well. This is particularly noticeable during gameplay! In the picture I added a lot of extra lights that overpowered much of the extreme glow, but I'd likely bump it back up a bit.
With the colors I was using, the emissive values made the objects feel like they were smoldering with some sort of bio-luminescent light. I didn't want it to look like a fire, as that delves more into supernatural rather than biological explanations, so it was tricky to settle on how bright it should be. Likely, I would have iterated on that a lot more.
Vertex animation.

It's tough to get two layers of sway to loop well.
Vertex animation is one of my favorite topics! The core idea is that you can put math-powered animations into the vertex shader. The excellent part is that this type of animation is so cheap, you can put it everywhere! It even works on static, batched objects and ridiculously old phones! If you're looking to add more life into your game, this is one thing you really don't want to miss out on.
In this particular case, I used two layers of sin waves to create a stuttered swaying motion on the reeds. The first layer is a large, sway with the wind motion that changes gradually over large areas. The second is a much smaller sway that produces variation within small clusters of reeds!
I also multiply the motion by the height of the vertex, so the sway is stronger at the top! For a more flexible solution, I might recommend vertex color painting, and multiplying by the color instead. You can see in this shader that I use Z in model space as the height value, which is primarily because I use Blender for models, where Z is up instead of Y.
Other tricks.

A birds-eye view of the scene.
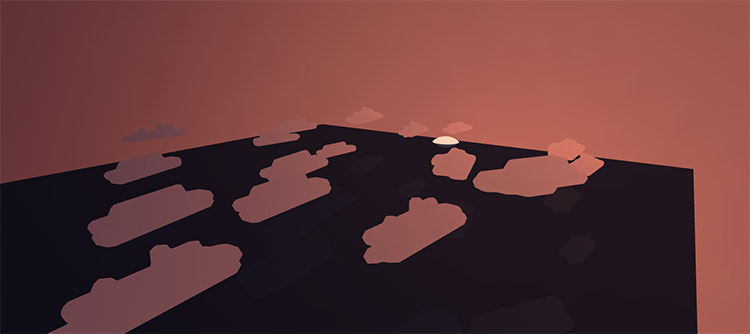
The clouds are actually completely unlit! I used a really cheap trick to make them look a little more interesting though. I take the world-space coordinates of the cloud verts, and use those to map to a gradient! This is a simplistic approximation of what happens during sunset, where clouds closer to the sun catch more of the light.
For the skybox, I used a similar trick! It's an unlit sphere with a gradient going from top to bottom. I then rotated it so that the bright part was right behind where I placed the sun. Super easy, but it looks quite nice!
Wishlist.
There's plenty of things I still wanted to do, but chief among them was fog. Even the basic built-in fog adds a nice dimension to the scene, but it doesn't blend well with the horizon. Perhaps a fog that samples color from the skybox? I also very much wanted a patchier fog floating around over the water. Something that might evoke the morning mists you see on-top of ponds.
I used a planar reflection for the water surface, which looks decent, but doesn't do ripples or transparency. I could improve on that, but I'd prefer to move in a direction where there's some sort of pond-scum or dense algae floating on top of the water! Then I could do some neat tricks with the scum parting or boiling around as enemies come in and out of it.
But another time, or another project! If you have any questions or comments about the things you've seen here, please do let me know! Hope you enjoyed :)


